Used to do art, somehow my canvas turned into cakes... Still learning, and slowly developing so maybe one day it will be more than a hobby...

This blogg is here for me to share my hard earned knowledge about making and decorating cakes, cupcakes, cookies and cakepops. I am self taught, so I have therefore learnt the hard way. Hopefully you won't have as hard of a time. Good luck, and Enjoy! J.

torsdag 19 december 2013

Vampire Vincent......


I call him "Vampire Vincent".
Ok so first of all a HUGE cheer for all you bloggers out there that keep this up. How you do it I don't know... I mean I LOVE blogging, but between actually making cakes and taking care of normal life, kids, work etc.. there is just no time! So yeah... you guys deserve some major CRED!!! 

SO yeah, here he is. My vampire cake. I know it's christmas now, and not halloween, but this was my halloween effort this year, I'm just a little late in posting ;-).

A friend of mine contacted me about possibly making her sons 18th birthday cake. He was quite clear what he wanted, he wanted himself as a vampire. as a cake.... So I had a few options. Either I made a flat cake with his face painted on it, the head as a cake.. or this. The head sculpted in rice krispies, and the body made of cake. Even though this seems quite an elaborate cake, this was by FAAAAAR the easy option in my eyes!!! carving into cake is something that scares me to death. I have tried it once, and let's just say my success rate is nil. SO. Here he is in all his scary glory... 

For a while I was worried. My goal throughout making this cake was to make him realistic and scary. And by the end... well, I mean I'm quite a conservative gal, and so are the people I made the cake for.. so yeah.. was worried it was slightly toooo scary ;-)... The reaction I got from the dad who came to pick it up was priceless though :-D... He honestly didn't realize what he was going to see! 

THE best reaction though, was from my niece. We were at the party when H. (my niece who is the same age as the birthday boy and knows him) sees it from across the room and across a heard of people standing around chatting... 
All you hear (remember we are at a party with a lot of people and it's loud) is:
 "WHAAAAAAAAT?!?!??!"
She stands up
"IT'S A CAKE"
"IT'S VIIIIINCENT!!!! IT'S ACTUALLY VINCENT!!!"
"BUT IT'S A CAAAKE"
Pushing her way through the crowd she gets to the cake and her face was priceless :-D!!!! I have never wished I had a camera in my hand more than I did in that moment!!!

:-D

Here are some pictures of the process of making this cake...

Rice krispie treat head!
Simply made rice krispie treats and shaped it.. though remember to grease your hands or you will have a nightmare!


Starting to "fondant" it. just to fill in gaps and holes to make the surface smoother.


When I was happy with the general shape of the face structure, I rolled out a large sheet of fondant (marshmallow fondant) and covered, smoothed it and started shaping details.


Hair and the initial painting. Oh and of course filling and stacking the cake! This one is essentially a 3 tiered cake, with a large dowel in the middle (or in this case I called it: the stake;-)) and small doweling between each tier and cake board. 
It's a chocolate brownie sponge filled with a raspberry mousse and a "dumle-fluff" (swedish word) which essentialy is chocolate caramels melted in whipping cream, cooled over night and then whipped! Sooooo yummy! I used:


DUMLE FLUFF
approx. 180 g dumle (chocolate covered caramels) 
3 dl of whipping cream

Melt the chocolate in the cream on the stove, but do NOT boil. Then cool in the fridge overnight(very important that its coooold)
Then whip.
Now it needs to whip quite slow. and if it's whipped for to long it can split. so I recommend just adding a pinch of baking powder at this point. This prevents it from splitting, making it quicker and easier to get the desired texture. 


Here he is covered in vanilla buttercream and his shirt buttoned up :-).


And the scary finished product :-)!!! 
Oh, I almost forgot to mention.. I came to the final of a cake competition with this baby! Unfortunately I didn't win. But I was soooo happy I mad sit to the final! Onwards and upwards ;-)! Here is the link to the competition, and the cakes I lost against;-)!


Sweet dreams my lovelies... 
......
MUAHAHAHAHHAhHhahahhahahhahh
......... 
(yes, that was supposed to resemble an evil laugh)


Enjoy.

-J.


söndag 10 mars 2013

Plumbers Cake.

This was my first cake Swedish style.

By swedish style I mean with mousses, marzipan, berries and stuff rather than just buttercream (though buttercream is welcome too). It was scary because it means a more unstable cake. But oh how yummy it is.

In this one I had Vanilla bavaroise... which is a type of mousse I guess. It is something that I quite easily could eat by the bucketload. it is not too sweet and the texture is heavenly. perfectly smooth. I am desperately trying to find the recipe that I used and am currently struggling so I will link a different recipe for now and update it if and when I find it. This recipe looks very similar: http://food.ninemsn.com/recipes/other/8338444/vanilla-bavarois

I also had strawberry mousse, but the recipe was not the best so I will not include it here. 

It was my husbands birthday. We have just moved to sweden and bought a 1930's house that is in need of some TLC. But as it is with every new relationship (even one between people and a house) there is some "growing pains". In our case it was the plumbing. 

Without going into too many details(trust me be grateful) We had to change the whole system. Nick was thrown off the deep end... and he came up not only swimming but doing a perfect crawl. He changed the whole system basically by himself. He had some guidance from my brother who happens to live next door, but he read up on it and then did it. Ellie, Penelope and I went to live with my parents for the week where I made this cake as it was Nick's birthday that weekend(yes he spent his weekend knee high in dumpage(the nicest word I could find for what it was). Thank you to my brother and his family for letting him use the shower! He loved the cake. He was so surprised and happy. He probably thought he wasn't getting anything considering the circumstances. I had the MOST fun making it as I got to learn so much about how to make a cake like swedes do it. I'm telling you It ain't easy.


Enjoy.
-J.

P.s the smears on the cake is cocoa powder.... ;-)


fredag 8 mars 2013

Lemon Glaze Cake.

I got this recipe from the Hummingbird bakery cookbook, though I did adjust it slightly as the original recipe required poppy seeds that I did not have at home. And either way I feel they only get stuck in my teeth!

We were going over to our neighbors house. My neighbors also happen to be my brother and his wife. We were going to bring a dessert. SO. Having quite a few lemons that needed using I set to making this wonderful cake. It is perfectly fluffy and moist and sweet and tart at the same time! 

Ingredients
85g unsalted butter
245g caster sugar
grated zest of 1 1/2 lemons
165ml whole milk
235g plain flour
2 teaspoons baking powder
1/2 a teaspoon of salt
3 egg whites
Lemon Syrup
juice and zest of 1 lemon
50g caster sugar
100 ml water
Lemon Glaze
Juice of 1 lemon
250g icing sugar

  1. Preheat your oven to 170c
  2. Beat the butter, sugar and lemon zest together in a large bowl.
  3. Slowly add the milk and beat well (don’t worry if it looks slightly split at this stage).
  4. In a separate bowl sieve the flour, baking powder and salt. Add this to the butter mixture in 3 stages, beating well after each addition.
  5. Beat the egg whites in a separate bowl until they form stiff peaks.
  6. Fold this gently into the cake mixture.  DO NOT overmix!
  7. Pour into mould (that has been buttered and floured) and bake for 30 - 35 mins until golden and the sponge bounces back when gently pressed.
  8. While the cake is baking, make the lemon syrup by adding the sugar, lemon zest, juice and water in a saucepan and gently boil it until it has reduced by half and it's a thin syrup.
  9. When the cake is cooked remove from the oven and spoon over the syrup while it is still in the tin and still hot.  
  10. Leave to cool in tin for 10 minutes.
  11. Turn out onto a wire rack.
  12. Make the icing whilst the cake is cooling by mixing the icing sugar and lemon juice together until smooth and glossy. You want it to be thick but still runnable.
  13. Once the cake has cooled, spoon over the glaze and let it run down the sides of the cake.

Enjoy.
-J.

onsdag 6 mars 2013

Minnie Mouse Cupcakes.

My first "commission". It was so nerve wrecking to hand them over. I didn't have a  camera at the time so I asked if she could take a picture of them for me and she did a wonderful job! This is quite a standard cupcake if you go looking for it on Google pictures but there is a reason why they are popular. 

Because they are so cute!

Enjoy.
-J.

Belle Princess Cake.

This is it. This is the cake that started it all.

This is the cake that fueled a desire to create more... and more... and more...

It was the birthday of Arrwin. Her mother came over to make it as a fun thing to do. If I remember correctly she come over with the sponges already made, which meant all we had to do was decorate. She loved Belle so her mother brought over a belle doll that was broken(had no legs). I happen to be a hairdresser so I came up with the idea of doing an "up-do", a proper one. Then we covered the part that would be in the cake with clingfilm.
After having put the cake together we started carving... and carving... and carving.


This was before I knew that I could save the crumbs for cakepops, which makes me cringe at the waste! 

I had a general idea of what I wanted to do it was just a matter of execution. One of the things that frustrated me the most was that after having held the piping bag for a while the buttercream was going soft. It was difficult to work with. I now know that I need to put the bag down, even put it in the fridge for resting now and then.

This was the result anyway.
I was quite happy with this considering it was my first real decorated cake.

Enjoy.

-J.

måndag 4 mars 2013

My First Wedding Cake.

This was not work.

My husbands best friend was getting married to a girl from Jersey. If you don't know where Jersey is, it's just off the coast of France, but it belongs to the British Isles. It is one of the most beautiful places I have ever been.

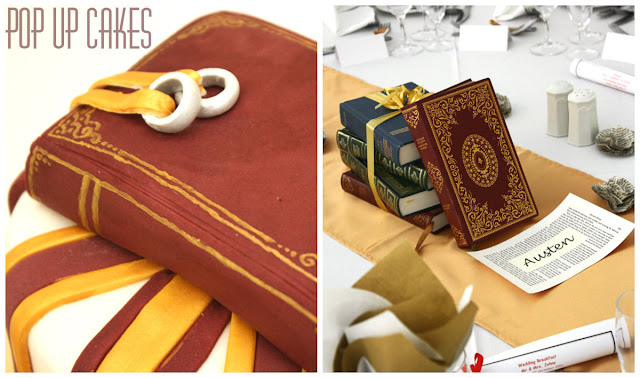
They wondered if I could decorate their wedding cake. They would order covered cakes from Marks and Spencers and I would simply decorate it. They know their colors (maroon and gold) and their theme. Literature. So I brought my colors and the rest they provided as I couldn't take sugarpaste on the plane. So it was a little of an improvisation job.


This was Nick and I's first vacation together as a married couple. And quite literally the first time I was away from my 2 year old... EVER. Nicks parents came up to help us out with babysitting for the 4 days we would be gone. I was so stressed before the trip. Nothing was going right. And my expectations for the the holiday were very low. I think the cherry on the cake was when we got there and there was no one there to pick us up. I was close to a nervous breakdown. Then we met one of nicks friends at the airport who was renting a car. And from then on our time was spent either on the beach, at an amazing wedding, at amazing restaurants and always with awesome people


Now about the cake.

So I started by picking off the little pieces of royal icing that M&S thought would be decorative. This was tedious work as it would leave marks on the cake. So I knew that I would need to cover the cakes again. I had some thought of what I would do but it had to be altered slightly by the BAD finish of the cake. For the amount of money they spent on that cake they didn't get great quality. That's for sure. But I did what I could with it and they were overjoyed with the result. 

I saw one of the books that they would have as a table decoration and immediately thought of it topping the cake. They loved the idea so I went for it and added the rings as they wouldn't have a bride and groom top it. 

The roses were made out of Sugarpaste, not Gumpaste.. Which perhaps gives you an idea of how difficult it was to get them semi-right.

After having worked for quite a few hours the bride and groom said that enough was enough. They didn't want me spending anymore time in the kitchen while everyone else in the wedding party including them were out on the beach. So they dragged me out and what an amazing time we all had!
  

Enjoy.

-J.

fredag 1 mars 2013

Dentists.

Perhaps not the best pictures in the world.
 
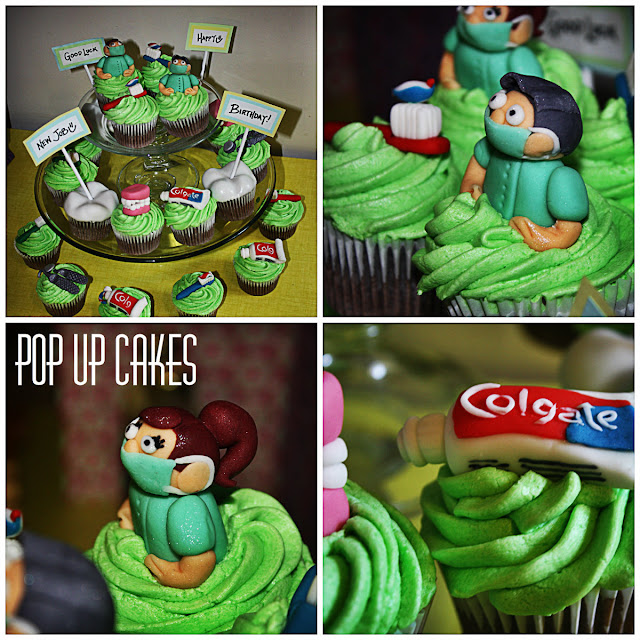
We used to own a business and we had our offices within a dental clinic. The owners were so sweet. At one point there was one nurse leaving for a new job at the same time as it was the head dentists birthday. So I threw together some cupcakes! 
Must say. These toppers were the most fun I have had making toppers. I mean little dentures???

Yeah. So if there is anyone out there wanting little dentist cupcakes. I would love to make these again!  


Enjoy.

-J.

torsdag 28 februari 2013

Hello Kitty Mini Cakes.

These are the cakes I wish I had had more time for.


I loved making these cakes. It was such a challenge and I can now say that I have made a 5 tiered cake... okay it was a mini one but still...

It was for the birthday of a friends daughter. She loves Hello Kitty and everything that is associated with it, so it was only natural for her to get a Hello Kitty cake. She was going to have a very small birthday with only 4 friends over so I suggested making mini cakes so they could have one individual cake each. Her mother loved the idea... 

...so now it was just up to me to realize what I had promised which was more difficult than I had expected...


I also decided to make some cakepops as I had seen a very cute way of making them into HK heads on pinterest. The biggest problem I had was keeping the cake upright. because it was such a small cake, narrow the whole way down, it was very willing to fall over. I solved the problem by sticking one of the cakepops into the top of the cake...

(this is when I discovered doweling)

...and bish, bash, bosh I had a 5 tiered cake that had accepted its upright position. Because I didn't have the time for this cake that I would have wanted the quality isn't the best. The piping is wobbly, the covering isn't perfectly smooth, but it was still really fun to make these little cakes. Would definitely love to make mini tiered cakes again!! 

Enjoy.

-J.

tisdag 26 februari 2013

Elinor's 2nd Birthday - Barnyard Cake.

Still very proud of this cake even though it was one of my very first.

It was for my own daughter Ellie(Elinor) who was turning 2 at the time. She like so many other toddlers her age loves animals and the noises they make so it was only natural to make a barnyard type cake. 

I planned it for weeks.

I started making the flowers and animals out of normal store bought sugarpaste (or regalice as it's known in the UK). No Gum Tragacanth to help with stability. I did learn from making this cake that some tools are a MUST. Considering the only tools I had were some flowercutters and some wilton gel food coloring... I dont think I did too bad. 

Also this was my first 2 tiered cake.
A couple of tip's and nono's when it comes to making a tiered cake: 
  • Read up on HOW to make one. Don't wing it....
  • Do not use frozen fruits (they melt in the cake and pool at the bottom...)
  • Use doweling(The cake will start to lean if not)
  • Also look up some youtube videos on how to cover a cake (preferably with a turntable)
  • Have some sort of thin flat plate between the tiers cut to the top tier's size. This is for when you cut the cake. with doweling under it is easy to cut and not have to worry that the bottom layer will collapse.
  • And for goodness sake... make your life a little easier and splash out on some proper cake decorating tools!! 
So.... you guessed it. I did all of the nono's and none of the tips.

Well life is for learning if for nothing else, right?

The result was great considering all of the above. Ellie couldn't have cared less about the details that I was stressing over. She worshiped the cake. Her friends loved it. And her birthday was a success. Because I had done so much planning ahead of time I was able to take some of the actual birthday off and enjoy it at the play park with the birthday girl. Great day all round!
 Enjoy.

-J.


måndag 25 februari 2013

Lego Cake.

This is the cake I wish I had taken better photo's of.


It is one of my favorite's. Even though if I had the cake making knowledge I have now back when I made it, it would have been so much better. I would have crumb coated the rice crispies so much more to give a better finish, I would have invented better fillings, I would have.. I would have... But I did learn so much from this cake, of what is possible and what I am capable of.  


A friend of mine is a nanny for a family in London who were looking for a cake for their son's birthday. My friend recommended me. And I took the challenge. Not only did I live 5 hours drive from London, but no one would be holding the cake on the journey down. My friend M. would drive up to pick it up, and keep it in the trunk on the way back down. 

Scary business.

But it made it. It survived. NOTHING broke! The Birthday boy LOVED his cake and apparently it started a cake craze at his school. They kept the Big Lego man for a while after. They gave him a name and he got to sit with them at dinner every night.


I think it was safe to say it was a success. 

Enjoy.
-J.

söndag 24 februari 2013

Angry Birds.

This is the cake I got most hits for on my last blog.

It was for my mother-in-laws birthday. We were living just north of Manchester, England at the time and they were coming up for the weekend from Oxford. Last minute I decided to make her a cake. And I immediately knew the theme and even what it would look like.... Angry Birds.

She loves this game.

And she is good at it. So I whipped up some chocolate sponges (I usually use the one out of the hummingbird bakery cookbook). If you make cakes regularly then save the crumbs and carvings in the freezer. They are perfect for making cakepops and other cake style truffles. 

Then I made some uber decadent chocolate FUDGE frosting and mixed the two(sponge and frosting) together to a big gu. It's a fine line of when it becomes to loose to hold it's shape, so make sure to add a little frosting at a time. I formed these cake-pop-type truffles, iced them, and covered them with sugarpaste. 

Then came the fun part.

Decorating each and everyone of these characters. I completely understand why Angry Birds became so big. It's obviously a fun game. but the characters help as well. 

Now.
Even the green pigs are little bite sized truffles :-O!

When the time came to show her the cake she loved it. She was so surprised(I am not a huge birthday celebrator). And it was so worth it seeing her face... and my father-in-laws!


I know my posts at the moment are a little vague, but it's because the cakes I am posting are from a while ago. Once I start getting up to date I will add recipes and more detailed How-toos. If you have any questions then please comment and I will answer as best I can.

Enjoy.

-J.

lördag 23 februari 2013

Harry Potter.


I did this cake quite a while ago now.

It was the birthday of George. The son of a very dear friend of mine. She was going to make the cake on her own, but then asked for my help to just guide her.

Of course I said yes.

What she wasn't counting on however was that I would take over. I couldn't help it. She had so much else on her plate(4 kids) and a birthday to plan. Also... I got to go what I love. it was a win/win. 

George loves Harry Potter.

He would run around with a Hogwarts uniform and a lightning on his forehead. And lets not forget the wand.

After juggling ideas back and forth we came up with this concept. One that has been done plenty by others.

Here is my take on it.
 I wish I could tell you what kind of cake it was now, but I honestly can't remember.  

If you read very closely on the cake I have included the recipe ;-).
 

 Notice the "I solemnly swear I'm up to JUST good".

Enjoy.

-J.

So about me.

Here we go again... Attempt 2 at blogging.

I would like to see my last try as a practice run and that this time... THIS time I will not only stick to it, but excel at it... I know I'm digging my own grave...


So about me.

I am a mother of two, wife of one, sister of 5 and daughter of 2. I live in Fritsla, Sweden. In a house that feels like its still stuck in the 30's but that we will slowly be bringing into the 21st century but with a rustic charm. My family consists of me Josefine, my husband Nick, my beautiful daughters Elinor(3) and Penelope(3 months). They are my life.

I started making cakes just over 2 years ago now and have been learning ever since. It's a hobby. I make cakes for friends and family and the occasional friend of a friend. One day maybe this will be more than a hobby, but not before I have given my everything to my family first. <3.


I love my family, my life and my kitchen.

Enjoy.

-J.